That chalky, often blue-green gunk growing on your car battery terminals is a common sight, but it's more than just an ugly mess. It’s corrosion, and it's actively choking the electrical life out of your vehicle. This buildup acts like an insulator, blocking the flow of electricity and leading to all sorts of frustrating problems, from dim headlights to a car that just won't start.
Understanding That Crusty Buildup On Your Battery

Ever popped your hood and spotted that crusty, powdery substance clinging to the battery terminals? That’s a crystal-clear sign of a problem that could easily leave you stranded. The corrosion on a car battery is a physical barrier between your battery's power and your vehicle's electrical system.
Think of it like a clogged pipe—water might still trickle through, but there's no real pressure. In the same way, a corroded terminal starves your car of the full electrical current it needs to start the engine and power your accessories. This forces the alternator to work overtime and can cause a host of electrical gremlins.
What Causes Battery Corrosion?
The science behind this common headache is actually a pretty straightforward chemical reaction. Your car’s lead-acid battery contains sulfuric acid and naturally vents a small amount of hydrogen gas during normal operation.
When these acidic vapors seep out and mix with the moisture and oxygen in the air, they react with the metal of the battery posts and cable terminals. This reaction forms the salt crystals you see, which we call corrosion.
A few things can really speed this process up:
- High Humidity: Here in North Texas, the summer humidity creates the perfect storm for corrosion, accelerating the chemical reaction.
- Battery Age: As batteries get older, the seals around the terminals can weaken, allowing more gas to escape.
- Overcharging: A failing alternator might overcharge the battery, causing it to overheat and vent even more acidic fumes.
A Quick Guide to Identifying Battery Corrosion
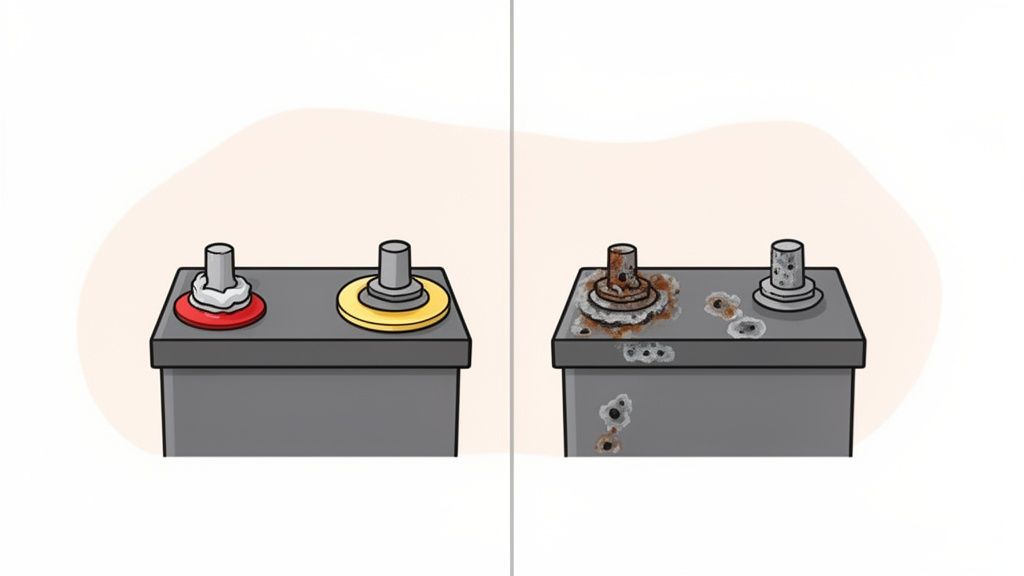
Not all corrosion looks the same. The color and location can give you clues about what’s going on under the hood. Use this visual guide to quickly identify the type of corrosion on your battery terminals and understand what it likely means.
| Corrosion Color | Terminal Location | What It Usually Indicates |
|---|---|---|
| White or Gray-ish | Can be on either terminal | Sulfation, often caused by an undercharged battery. The battery may be nearing the end of its life. |
| Blue or Green-ish | On the positive (+) terminal | Copper sulfate, a common reaction when the copper in the terminal clamp corrodes due to overcharging. |
| White or Gray-ish | On the negative (-) terminal | Often a sign of undercharging. Your alternator may not be supplying enough power to keep the battery fully charged. |
Knowing what to look for can help you pinpoint whether you're dealing with a simple cleaning job or a symptom of a deeper electrical issue.
Why This Buildup Is a Serious Problem
Ignoring battery corrosion is a gamble you don't want to take. It's a leading cause of automotive electrical failures. In fact, battery-related issues are behind roughly 40% of all electrical failures in vehicles. That powdery buildup can slash electrical conductivity by as much as 50%, forcing your starter to struggle and eventually burn out. With the average car on the road getting older, more drivers are running into these corrosion-related headaches, as highlighted in market analysis from Grandview Research.
At first, the symptoms might be subtle—headlights that seem a bit dim or a starter that sounds sluggish on a cold morning. But as the corrosion worsens, it can completely block the electrical current, leaving you with a car that won't start at all.
Your Essential Toolkit for Safe Battery Cleaning
Before you even think about touching the terminals, the first non-negotiable step is getting your supplies together. Let's be clear: working on a car battery, even for a simple cleaning, means you're dealing with some pretty harsh, potentially hazardous stuff. Prepping your toolkit first means you can work safely, get the job done right, and avoid scrambling for a rag or a pair of gloves mid-cleanup.
The good news? You don’t need a pro mechanic’s toolbox for this. Most of what you need is probably already in your garage or under the kitchen sink. The most critical items are the ones that protect you from that acidic, crusty buildup.
Personal Protective Equipment
Your safety is the absolute top priority here. Battery acid is no joke—it can cause serious skin burns and is especially dangerous if it splashes into your eyes. Do not skip this gear.
- Safety Goggles or Glasses: This is mandatory. One tiny splash of neutralized acid solution is all it takes to cause permanent eye damage.
- Acid-Resistant Gloves: A good pair of nitrile or rubber gloves will keep your hands protected from direct contact with the corrosive gunk and any stray battery acid.
Always put your safety gear on before you even pop the hood. It’s a simple habit that prevents easily avoidable accidents and lets you focus on the task at hand.
Cleaning and Maintenance Tools
Once you’re geared up and protected, you'll need just a few things to actually tackle the corrosion and keep it from coming back. The cleaning solution itself is a simple, effective mixture you can whip up at home.
Your basic cleaning kit should include:
- Baking Soda and Water: A paste made from these two is the perfect, safe way to neutralize the acidic corrosion.
- Stiff-Bristle Brush: An old toothbrush will do in a pinch, but a dedicated battery terminal wire brush is even better for scrubbing away the loosened gunk.
- Clean Rags or Paper Towels: You’ll need plenty for wiping away the cleaning solution and getting the terminals completely dry.
- Petroleum Jelly or Dielectric Grease: After everything is clean and dry, a thin layer of one of these will create a protective barrier against future moisture and fumes.
A Practical Process for Removing Battery Corrosion
Alright, you've got your safety gear on and your tools laid out. You're ready to get rid of that crusty, power-sapping buildup. This isn't a complicated job, but following the right steps is key to doing it safely and effectively. Think of this as hitting the reset button on your car's electrical system.
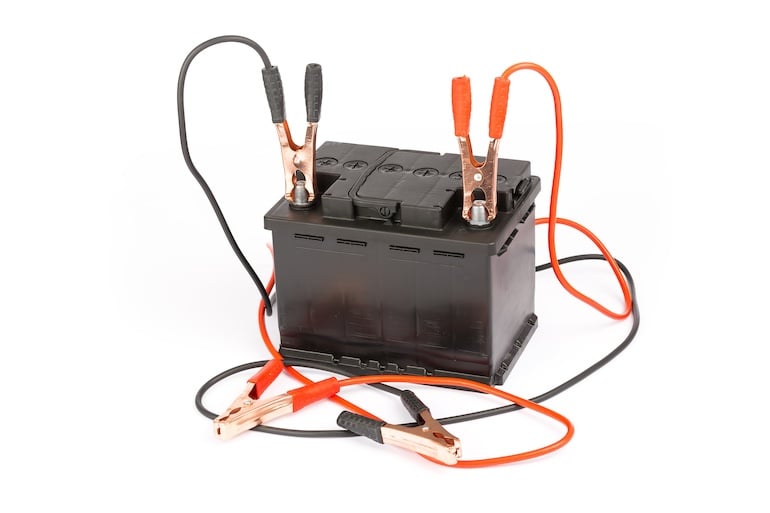
The very first move—always—is to safely disconnect the battery. This simple action prevents any accidental short circuits that could fry your car's sensitive electronics or create a dangerous spark. Start with the negative (-) terminal, which usually has a black cover or a "NEG" stamp. Loosen the nut on the cable clamp with your wrench, then gently twist and pull the cable off the terminal post.
Once it's free, tuck it out of the way so it can't accidentally touch the post again. Now you're clear to do the exact same thing for the positive (+) terminal.
Creating and Applying the Cleaning Solution
Now for the fun part. It’s a bit like a middle school science experiment. In a disposable cup, mix a heaping tablespoon or two of baking soda with just enough water to create a thick paste. You're looking for a consistency similar to pancake batter. This humble mixture is a powerful, safe base that will chemically neutralize the acidic corrosion.
Slather that paste generously over all the corroded spots on the battery terminals and the cable clamps. You'll probably see it start to bubble and fizz almost immediately—that’s a great sign! It means the baking soda is doing its job, neutralizing the sulfuric acid and breaking down that crusty gunk right before your eyes. Let it sit and work its magic for a few minutes.
This infographic breaks down the simple but essential gear needed to tackle battery cleaning safely and effectively.

It highlights a straightforward approach: gear up for safety, use the right tools for cleaning, and finish with a protective coat.
Scrubbing Away the Grime
Once the fizzing has died down, it's time to put in a little elbow grease. Grab your wire brush or an old toothbrush and give the battery posts and the inside of the cable clamps a thorough scrubbing. Don't just clean what you can see on the outside; corrosion on a car battery loves to hide inside the clamps, which is where the most critical electrical connection happens.
Keep scrubbing until you see shiny, bare metal. A clean, solid connection is what we're after. A poor one can cause all sorts of electrical gremlins, from dim headlights to a car that won't start. You can learn more about checking your battery's health in our guide on testing a battery with a multimeter.
After scrubbing, rinse the terminals and clamps with a small amount of clean water to wash away the baking soda residue and loosened crud. Be careful not to drench the battery or let water run down its sides. Finally, dry everything completely with a clean rag. Any moisture left behind can kickstart the corrosion process all over again.
Reconnecting the battery is the exact reverse of how you disconnected it. Always connect the positive (+) cable first, followed by the negative (-) cable last. This sequence minimizes the risk of creating sparks.
This whole problem is nothing new; it’s been a headache for drivers since the lead-acid battery was invented back in 1859. The scale of the issue today is massive. In the U.S. alone, corrosion plays a role in over 50 million annual battery replacements, adding up to a staggering $20 billion yearly cost for consumers. It's a huge, yet often preventable, expense.
Smart Prevention to Keep Corrosion Away
Getting rid of that fuzzy, power-draining buildup is a great short-term fix. But the real victory is making sure the corrosion on your car battery doesn't stage a comeback. A few simple, proactive steps can transform battery maintenance from a reactive chore into a routine that saves you time, money, and future headaches.
The key is creating a protective barrier that shields the metal terminals from the acidic fumes that cause corrosion in the first place. And you don't need expensive specialty products, either. Common household items work just as well to keep that electrical connection strong and reliable.
Applying a Protective Barrier
After you've cleaned and dried the terminals and cable clamps, the next step is to insulate them. A thin, even coating of a protective substance is all it takes to prevent moisture and hydrogen gas from reacting with the lead and copper.
You have a few excellent options here:
- Dielectric Grease: This is a non-conductive, waterproof silicone grease designed specifically for electrical connections. It's a favorite among professional technicians for a reason—it seals out moisture perfectly.
- Petroleum Jelly: Yep, good old Vaseline. A thin layer works wonders. It's inexpensive, easy to find, and creates an incredibly effective barrier against the elements.
- Terminal Protector Spray: Auto parts stores sell aerosol sprays that leave a protective, often red-colored, film over the terminals. They are super easy to apply and provide solid protection.
Whichever you choose, just apply a light coat to the battery posts and the inside of the cable clamps before you reconnect them. Once they're reconnected, add another thin layer over the entire connection for complete coverage.
More Smart Prevention Tactics
Beyond applying a protective coating, you can add another layer of defense with a very simple and affordable upgrade. Consider installing anti-corrosion washers. These are small felt rings treated with a special corrosion-inhibiting compound that you simply slide over the battery posts before reconnecting the cables.
Think of these preventative measures as a small investment in your car's reliability. A few minutes of effort during routine maintenance can drastically extend your battery's lifespan and prevent the kind of electrical issues that leave you stranded.
Statistically, these simple fixes have a huge impact. Corrosion-induced failures increase electrical resistance, draining cranking amps by 30-60%. Here in Texas, our heat and humidity can double corrosion rates, making proactive care even more critical. Applying something like dielectric grease can extend battery life by up to 50% and help you avoid a premature replacement.
For more insights into battery longevity, check out our guide on how long a car battery should last.
When a DIY Cleaning Isn't Enough
While a baking soda paste and a bit of elbow grease can work wonders on that chalky buildup, it's critical to know when corrosion on your car battery is just a symptom of a much deeper problem. A DIY cleaning is a great first step, but it’s not a magic bullet.
Certain red flags tell you the issue has moved beyond a simple maintenance task and now requires a professional eye. Ignoring these warning signs can lead to more than just a car that won’t start; you could be looking at expensive damage to your vehicle's entire electrical system. Knowing when to put down the wire brush and pick up the phone is just as important as knowing how to clean the terminals in the first place.
Red Flags That Signal a Deeper Issue
Sometimes, what you see on the outside is a clear warning of a serious internal failure. If you spot any of these issues during your inspection or cleaning, it's time to stop and get professional help. These are not problems you should try to fix at home.
- A Cracked or Bulging Battery Case: If the battery casing looks swollen, has a crack, or is leaking fluid from anywhere other than the terminals, it's a serious hazard. This usually means the battery has been overcharged or has frozen solid, and it needs to be replaced immediately by a professional.
- Corrosion Has Damaged the Cables: Has the corrosion eaten away at the metal of the battery cables or clamps? Simply cleaning them won't cut it. A damaged cable creates high resistance, which leads to starting problems and can even melt the cable's insulation.
- A Rotten Egg Smell: That distinct sulfur smell around the battery is a major red flag. It means the battery is leaking sulfuric acid and venting dangerous, flammable gas. Do not attempt to jump-start or service a battery in this condition.
These physical signs are definitive proof that the battery itself has failed and is no longer safe to operate.
When you see physical damage to the battery or its connecting hardware, the conversation shifts from cleaning to replacement. A compromised battery case or frayed cable isn't just a performance issue—it's a significant safety risk.
When Electrical Gremlins Persist
So, what if you've done a perfect cleaning job? The terminals are gleaming, the connections are tight… but your car still acts up. These nagging electrical symptoms are your car’s way of telling you that the problem was never just about the surface corrosion.
If you’re still experiencing issues like these after a thorough cleaning, it's time for a diagnostic:
- Slow, Grinding Starts: Your engine struggles to turn over, especially first thing in the morning.
- Dimming Headlights: The lights flicker or dim when you start the car or use accessories like the power windows.
- Warning Lights on the Dash: The battery or check engine light just won't go away.
- The Battery Won't Hold a Charge: The car starts fine after a jump but is dead again the next day.
These symptoms often point to one of two culprits: a dying battery that can no longer hold a sufficient charge, or a problem with the vehicle's charging system, like a faulty alternator. In these cases, you’re dealing with an electrical system issue that needs professional tools and expertise to diagnose correctly. Our technicians can perform a full diagnostic to pinpoint the exact cause; you can learn more about our professional battery services and diagnostics to see how we can help.
Common Questions About Battery Corrosion
After you've cleaned up the terminals and given everything a once-over, you might still have a few questions. That’s perfectly normal. When you're dealing with your car's electrical heart, you want to be sure you're doing things right. We get asked about corrosion on car battery terminals all the time, so let's clear up some of the most common points of confusion.
Getting these details straight can mean the difference between a one-and-done fix and a problem that keeps coming back.
Is Battery Corrosion an Immediate Emergency?
Usually, no. A little bit of that white or blue-green powder isn't a "pull over right now" crisis. But you absolutely shouldn't ignore it. Think of it as an early warning sign from your battery. It’s telling you that the electrical connection isn't as clean as it should be, and that inefficiency will only get worse.
If you let it build up, you’re setting yourself up for a no-start situation, probably at the worst possible time. The smart move is to clean it off as soon as you can, like over the weekend or before you head out on a long drive. The only exception? If you see the battery case is cracked or you smell a strong "rotten egg" odor. That's a sign of a serious leak, and you should call a pro right away.
Can Corrosion Drain a Car Battery When It Is Off?
Yes, it can, but not in the way most people think. It's a common misunderstanding. The fuzzy buildup itself doesn't actively suck power from the battery like leaving your headlights on does. What it does do is create a barrier of high electrical resistance right on the terminals.
This resistance can cause a tiny, slow current leak, often called a parasitic draw. Even more critical is how it interferes with charging. It acts like insulation, preventing the alternator from efficiently and fully recharging the battery when the engine is running.
Over time, that poor connection means your battery never truly gets back to 100%. Eventually, it seems like the battery just died overnight, even when you know nothing was left on. It’s a slow death caused by a consistently incomplete charging cycle.
Why Does Corrosion Come Back So Fast?
This is a frustrating one. You clean the terminals until they shine, and a few weeks later, the fuzzy gunk is back. When this happens, it’s almost always a sign of a deeper issue.
Here are the usual suspects:
- A Tiny Leak: As a battery gets older, the seals around the terminal posts can get brittle and develop microscopic cracks. This allows more acidic vapor to escape than normal, which is the root cause of corrosion.
- Overcharging: Your alternator could be forcing too much voltage into the battery. This makes the battery chemistry work overtime, causing it to overheat and vent excess gas. This is a job for a professional diagnostic tool to confirm.
- It's Just Old: The average car battery lasts 3 to 5 years. As it nears the end of its life, it naturally off-gasses more. If you're constantly cleaning corrosion off an older battery, it's a huge hint that it's time for a replacement.
Just cleaning it over and over without finding the real problem is a battle you won't win. If that corrosion is persistent, your car is telling you that either the battery is on its last legs or there’s an issue in the charging system itself.
Are you dealing with corrosion that just won't quit, or are you just not sure about your battery's health? Don't leave it up to guesswork. The ASE-certified technicians at Kwik Kar Oil Change and Auto Care have the diagnostic tools to pinpoint the real cause. Visit us for expert service you can trust.