Before you even think about putting a wrench on that battery, let's get our gear in order. Knowing how to remove a car battery safely is less about muscle and more about being prepared. A successful and safe removal really hinges on having the right tools and, more importantly, the right safety gear ready to go from the start.
Gathering Your Tools And Safety Gear
Pulling a car battery is a straightforward job, but it’s one that comes with real risks. We're talking about corrosive acid and some serious electrical current. It’s surprisingly easy to get hurt, and improper battery handling is a common cause of DIY auto repair injuries. In fact, mistakes during disconnection account for nearly 25% of all DIY auto repair accidents in the U.S.
This is why a safety-first approach isn't just a friendly suggestion—it’s a must. It protects you, and it protects your car's sensitive electronics from an expensive mistake.

Here's a quick rundown of the essentials you'll want to have within arm's reach.
Required Tools and Safety Gear
| Item | Purpose | Pro Tip |
|---|---|---|
| Safety Glasses/Goggles | Protects your eyes from acid splashes. | Full-coverage goggles are best. A tiny splash can cause permanent damage. |
| Insulated Gloves | Prevents acid burns and electrical shocks. | This is non-negotiable. Don't risk creating a circuit with your hands. |
| Wrench or Socket Set | To loosen terminal clamps and hold-down brackets. | Most cars use 8mm, 10mm, or 13mm sockets. An extension bar is helpful. |
| Battery Terminal Cleaner | A wire brush to scrub away corrosion for a good connection. | Clean terminals ensure your new battery works perfectly from the get-go. |
| Baking Soda & Water | Neutralizes any spilled battery acid. | Keep a small paste mixture handy just in case. |
Having these items ready before you begin makes the entire process smoother and, most importantly, safer.
H3: Essential Protective Equipment
Your first priority, always, is you. Don't even think about skipping these items—they are the only things standing between you and a very bad day.
- Insulated Gloves: These are your best defense. They protect your hands from any corrosive acid and, crucially, prevent you from becoming part of the electrical circuit if you accidentally touch both terminals.
- Safety Glasses or Goggles: Battery acid can pop and splash unexpectedly. A small drop in your eye is a serious medical emergency. Your everyday glasses won't cut it; you need proper, full-coverage eye protection.
H3: The Right Tools For The Job
Using the correct tools is the difference between a five-minute job and a frustrating afternoon with a stripped bolt. Most battery terminals and the clamps holding them down use very common nut and bolt sizes, so a basic socket set is usually all you need.
You'll almost certainly need a wrench or a socket set with 8mm, 10mm, and 13mm sockets, as these three sizes cover the vast majority of vehicles on the road today. A socket extension can be a real lifesaver for getting to those hard-to-reach bolts on the hold-down clamp. A battery terminal cleaner—a small, specialized wire brush—is also great to have for scrubbing away any fuzzy blue or white corrosion.
If you aren't sure if your battery is the problem, you can always check out our guide on how to test a battery with a multimeter here: https://www.kkrichardson.com/kwik-blog/how-to-test-battery-with-multimeter/
Pro Tip: Grab a small magnetic tray or even just an old yogurt cup to keep the nuts and bolts in. It is incredibly easy to drop a tiny-but-critical piece deep into the engine bay, never to be seen again.
It's also a smart idea to have a reliable lithium jump starter in your garage. You never know when you might need it, and being prepared for anything is what a good DIYer does.
How to Find and Assess Your Car Battery
With your safety gear on and tools laid out, the first real step is to find the battery. Most of the time, it's right there under the hood, usually tucked away on one side of the engine bay. But don't assume—automakers love to get creative to improve weight distribution or just to make things fit.
Don't be surprised if you pop the hood and it’s not there. Plenty of cars, especially brands like BMW and Chrysler, stash the battery in the trunk, hidden under the floor panel. Some trucks and bigger SUVs will even put it under a passenger seat. When in doubt, your owner's manual is your best friend. A quick look will save you a ton of time and frustration.
Identifying Terminals and Checking Condition
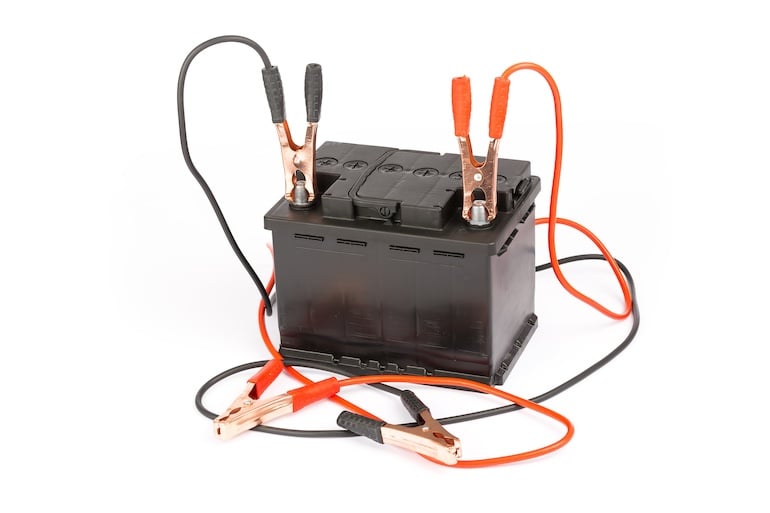
Once you’ve located it, pause for a moment and get your bearings. You’ll see two connection points on top—those are the terminals. They are almost always clearly marked with a plus sign (**) for positive and a minus sign (-) for negative. The positive terminal will often have a red plastic cap snapped over it as an extra visual cue.
Getting this right is absolutely critical. The entire safety of this job hinges on disconnecting the negative cable first.
Here’s a pro tip I give everyone: take a quick picture with your phone before you touch a single thing. It’s a simple trick that gives you a perfect "before" shot to reference when you're hooking up the new battery.
Now, give the terminals a good look. Are they clean, or do you see a chalky, crusty buildup? This stuff, which can be white, blue, or greenish, is lead sulfate—a normal byproduct of the battery doing its job. A little bit is fine, but a lot can mess with the electrical connection and make the clamps a real pain to get off.
Heavy corrosion can also signal other issues. If you want to dive deeper into what a healthy battery looks like, check out our guide on how a car battery voltage chart works.
Most car batteries are classified as wet, acid-filled electric storage batteries, so seeing some of this corrosive buildup isn't unusual. If it’s really caked on, you'll need to clean it before you can go any further.
Prepping for a Clean Removal
If your battery terminals look like they have a bad case of frostbite, that corrosion can essentially weld the clamp to the battery post. Trying to force it off with a wrench is a recipe for frustration and potential damage.
Dealing with the gunk before you try to loosen the bolts will make the whole process a hundred times smoother. This quick visual check ensures you won't run into any nasty surprises once you start turning wrenches. A little prep work here makes the actual removal much safer and easier.
The Correct Way to Disconnect Battery Cables
When it comes to removing a car battery, nothing carries more weight than disconnecting the cables in the right order. In fact, always disconnect the negative terminal first—it’s the golden rule that keeps sparks at bay. Your car’s chassis is grounded to that negative post, so breaking that link immediately neutralizes the risk of a dangerous arc if your wrench meets metal.
Most cars use a 10mm wrench for the terminal nuts. Slip it onto the nut marked with the minus (–) sign and turn counter-clockwise just enough to free the clamp. No need to strip the nut off completely; a little wiggle is all it takes.
Before you reach for the wrench, take a moment to visualize the process. This quick sketch will guide you from popping the hood to inspecting those battery posts—all in three simple moves.

The Disconnection Sequence
Once the negative clamp is loose, lift it straight off—avoid prying with a screwdriver to keep the post intact. If it’s stubborn, gently twist it back and forth or use a battery terminal puller designed for the job.
After it’s free, tuck that cable well out of the way so it can’t swing back and touch the post. With the ground circuit safely open, repeat the same process on the positive (+) side:
- Loosen the nut just enough to slide the clamp off
- Lift the clamp carefully to avoid bending the lead
- Secure the cable so it can’t flop onto the battery
Safety First Always: Pro technicians always shut off the engine and wait about 10 minutes before grabbing a wrench. That pause lets any residual charge in the capacitors drain away.
Following this sequence isn’t just a suggestion—it’s backed by AAA research showing it cuts spark-related accidents by 95%. For a deeper dive into market data, check out Fortune Business Insights.
Dealing With Stubborn Terminals
Corrosion can glue clamps in place, but this isn’t the time to muscle up with bigger tools. Try these smarter fixes instead:
- Baking Soda Solution: Mix baking soda and water, scrub gently with a wire brush, then rinse and dry.
- Battery Terminal Puller: This specialty tool applies even pressure to lift the clamp without warping the post.
With both cables disconnected and stowed safely, you’ve isolated the battery electrically. Next up: unbolt it from its tray and get ready to lift it out.
Removing the Battery and Cleaning the Tray
Now that the cables are safely out of the way, your battery is electrically disconnected. The last thing holding it in place is a hold-down clamp or bracket. Your job now is to free it.
These clamps come in a few different styles. You might see a simple metal bar running across the top of the battery, held down by a couple of long bolts. Or, it could be a smaller, wedge-like piece at the base holding it snug. Whatever the design, a socket wrench with an extension is usually your best friend here, giving you the reach you need.

Lifting and Handling the Old Battery
With the hold-down clamp removed, it's time to lift the battery out. Brace yourself—car batteries are deceptively heavy, often weighing anywhere from 40 to 60 pounds. That awkward weight can be a real back-breaker if you're not careful.
To lift it safely, remember these key points:
- Bend with your knees, not your waist. Let your legs do the work.
- Keep your back straight and lift in one smooth, controlled motion.
- Get a solid grip on it. Many batteries have a built-in handle, which helps immensely.
- Most importantly, keep the battery level. You don’t want any acid sloshing out of the vent caps.
Crucial Takeaway: A sudden tip or drop can cause sulfuric acid to leak, which is a serious safety hazard. Treat the battery like you would a full bucket of water—keep it perfectly upright as you remove and carry it.
Cleaning the Tray and Terminals
Once the battery is out, you'll have a clear look at the tray where it was sitting. This next part is a step many people skip, but it’s vital for the health of your new battery. Over time, that tray and the cable connectors get caked with dirt, acid mist, and corrosive gunk.
A simple paste of baking soda and a bit of water works wonders to neutralize any lingering acid. Grab a stiff wire brush and give the tray and the inside of the cable clamps a good scrubbing until they’re shiny. This little bit of effort helps prevent sulfation and, according to some industry stats, can extend your new battery's life by up to 25%.
After you've scrubbed everything down, wipe the area clean with a damp cloth and let it dry completely. A clean, solid surface ensures your new battery sits securely and gets a perfect electrical connection from the moment you install it. To get a better look at what you're cleaning up, check out our guide on dealing with corrosion on a car battery.
When to Skip DIY and Call a Professional
Knowing how to remove a car battery is a great skill to have. But real wisdom is knowing when to leave the wrenches in the toolbox and call for backup. While many battery swaps are pretty straightforward, some situations can turn a simple job into a frustrating, expensive, or even dangerous ordeal.
One of the biggest red flags is severe corrosion. If that chalky white or blue-green buildup has basically fused the clamps to the battery posts, don't try to force it. You can easily break the terminal or the clamp itself, turning a simple replacement into a much bigger repair job.
Another common roadblock is the battery’s location. Automakers are getting creative, tucking batteries away in some wild places—under a fender, beneath a seat, or buried deep in the trunk. Getting to them often requires special tools and taking apart other components first. It’s a major headache.
Complex Electronics and Physical Risks
In modern cars, the battery is much more than a power source; it’s the heart of a complex electronic network. Simply disconnecting it can cause a cascade of problems, from losing your radio presets to scrambling critical engine and transmission computer settings.
To prevent this, we use a tool called a "memory saver." It plugs into your car’s diagnostic port and provides just enough power to keep all the computer systems happy while the main battery is disconnected. Without one, you risk frustrating electronic glitches or a trip to the dealership for a costly computer re-flash.
Our Pro Takeaway: Don't underestimate the physical side of this job. Car batteries are surprisingly heavy, often weighing over 40 pounds. Lifting one at an awkward angle out of a cramped engine bay is a perfect recipe for a back injury.
For our neighbors right here in Richardson, this is where Kwik Kar brings peace of mind. Our ASE-certified technicians have the right equipment, including memory savers, and the experience to handle any challenge safely. We know the ins and outs of modern vehicles and can navigate even the most complicated battery replacements.
Going with a professional means you avoid damaging your car’s sensitive electronics, fighting with seized parts, or hurting yourself. Plus, we proudly honor our discounts for military, first responders, and healthcare workers. When you hit a roadblock, just give us a call—it's the safest way to get back on the road.
Common Car Battery Removal Questions Answered
Questions always pop up when you’re about to tackle a battery swap. You might have your tools laid out on the driveway, but you still wonder: what if I get it wrong? To save you headaches (and sparks), our Kwik Kar technicians have shared the top FAQs they hear every day.
What Happens If I Disconnect The Positive Terminal First
Touch the positive cable before the negative one, and your wrench becomes a live conductor. Your car’s frame and engine block act as ground, so any stray spark turns into a short circuit. Imagine a torch-like flash welding your tool to the battery, or worse—venting flammable hydrogen gas.
Always remove the negative cable first. It instantly kills the ground connection and keeps the whole setup safe.
How Do I Know If My Battery Really Needs To Be Replaced
No one wants to be stranded on a frosty morning. Look out for these warning signs:
- Slow Engine Crank: The starter turns the engine over but feels labored.
- Dimming Lights: Headlights or cabin lights fade when you fire up the engine.
- Dashboard Warning: That battery-shaped icon you’d rather not see.
- Physical Cues: A bulging case or any fluid seeping from the battery.
Once your battery tops three years old, a professional load test is a smart move. At Kwik Kar, our techs measure its true health so you’re never left guessing.
How Should I Dispose Of My Old Car Battery
Old car batteries are hazardous waste—lead and sulfuric acid can poison soil and groundwater. Fortunately, nearly every auto parts store that sells batteries will accept your old one and often give you a core charge credit toward a new purchase.
When you replace your battery at Kwik Kar, we handle the recycling for you. That way, you know it’s being processed safely and responsibly.
Do Modern Cars Need A Memory Saver Tool
On many newer vehicles, a memory saver is more than a nice-to-have—it’s essential. This small gadget plugs into the OBD-II port and feeds low-voltage power to your car’s electronic systems while the main battery is out.
Without it, you risk losing:
- Radio presets and clock settings
- Navigation routes
- Critical engine and transmission data
Skipping a memory saver can lead to odd glitches—erratic idle, lost seat positions, or even a dealer visit for a costly “relearn” procedure.
When the job feels too complex or you’d rather leave it to the pros, swing by Kwik Kar Oil Change and Auto Care. Our certified technicians bring the right tools—memory savers included—and years of experience to get your battery swapped safely. Schedule your service today at Kwik Kar Oil Change and Auto Care.