The Invisible Danger: Why Brake Fluid Isn’t ‘Set and Forget’
Picture this: you’re on the highway, traffic stops suddenly ahead, and you press the brake pedal — only to feel it sink lower than expected, soft and spongy under your foot. That unsettling moment is often the first sign that your brake fluid has been quietly failing you for months. Most drivers never see it coming.
Brake fluid is hygroscopic by design, meaning it’s engineered to attract and absorb moisture from the surrounding air. This isn’t a flaw — it’s intentional. By pulling water into the fluid itself rather than letting it pool and corrode brake lines, the system buys time. But that window closes fast. According to Mighty Auto Parts, brake fluid can absorb up to 2% of its volume in moisture within just 12 months of normal use. Over time, that absorbed water dramatically lowers the fluid’s boiling point, setting the stage for a dangerous condition called brake fade.
Brake fade occurs when overheated fluid — weakened by moisture contamination — vaporizes under the intense heat of emergency braking. Vapor doesn’t compress the way liquid does, so the pedal loses resistance and stopping power drops sharply. It’s most likely to happen at the exact moment you need your brakes most.
Neglect is far more common than most drivers realize: AAA reports that 88% of repair shops say drivers routinely miss critical brake fluid maintenance — a striking contrast to the near-universal awareness around oil changes.
The fix is straightforward: a scheduled brake fluid flush replaces degraded fluid before moisture levels become dangerous. Understanding how often this service is actually needed can prevent repair bills that dwarf the cost of prevention.
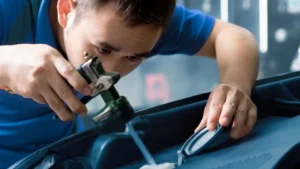
At Kwik Kar, transparent maintenance means showing customers exactly what’s happening inside their vehicle — not selling services they don’t need. Before recommending any flush, the process starts with a thorough inspection. That’s where the real diagnosis begins.
Step 1: Inspecting Fluid Quality and Identifying Contamination
Before scheduling a brake fluid change or purchasing supplies, you need to confirm whether a flush is actually necessary — and the answer is usually visible before you even open the hood all the way.
Visual Inspection: Color Tells the Story
Fresh brake fluid has a distinctive honey-gold or light amber color. That clear, warm tone signals that the fluid is clean, chemically stable, and doing its job. When fluid ages, absorbs moisture, and breaks down metal compounds from your brake lines, it darkens — progressively shifting from yellow to the color of iced tea, then eventually to something closer to black coffee.
Pop open your brake fluid reservoir (it’s typically a small translucent cap near the firewall on the driver’s side) and hold a white cloth or paper towel next to it for comparison. If the fluid looks dark amber or brown, that’s a strong visual signal to act. If it’s near-black, you’re already overdue.
Contaminated brake fluid doesn’t just look bad — it actively corrodes brake system components from the inside out.
Copper Strip Test: Catching Hidden Corrosion
Visual checks have limits. A fluid can look borderline acceptable while still carrying dissolved copper particles — a direct indicator of internal corrosion in your brake lines and calipers. Copper test strips (available at most auto parts retailers for under $10) detect this degradation chemically. Dip the strip into the reservoir fluid and compare the color change to the included chart. A reading above 200 ppm of copper typically means your system needs attention.
Electronic Moisture Testers: The 3% Rule
The most precise diagnostic tool is an electronic brake fluid moisture tester. According to Mighty Auto Parts, a 3% moisture accumulation causes a 25% drop in the boiling point of DOT 3 brake fluid — a drop significant enough to cause vapor lock under hard braking. Three percent is the point of no return. These testers cost around $20–$40 and give a readout in seconds.
Pro Tip: Look for fluid that appears cloudy or milky — this indicates emulsified water, which is just as dangerous as a high moisture reading on a tester. Either condition warrants an immediate professional brake service.
Verification Checkpoint
If your fluid is dark brown, tests above 200 ppm copper, or registers 3%+ moisture, the diagnosis is clear: a flush is needed now — not at your next oil change. Once you’ve confirmed that, the next critical question is which fluid your vehicle actually requires.
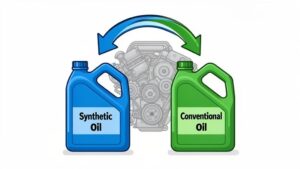
Step 2: Choosing the Right Fluid (DOT 3, 4, or 5.1)
Now that you’ve assessed your fluid’s condition, the next critical decision is selecting the correct replacement fluid. Pouring the wrong type into your brake system isn’t just an inconvenience — it can compromise your entire braking setup and turn a straightforward brake fluid flush cost into a much larger repair bill.
Breaking Down the DOT Ratings
DOT ratings are federally regulated standards that define a brake fluid’s minimum dry and wet boiling points. Here’s how the most common types compare:
| Fluid Type | Dry Boiling Point | Wet Boiling Point | Best Use Case |
|---|---|---|---|
| DOT 3 | 401°F | 284°F | Older vehicles, light-duty daily driving |
| DOT 4 | 446°F | 311°F | Modern vehicles, performance driving |
| DOT 5.1 | 500°F | 356°F | High-performance or heavy-duty applications |
| DOT 5 (Silicone) | 500°F | 356°F | Classic/show cars without ABS |
DOT 3 and DOT 4 are both glycol-based fluids and are generally compatible, though you should never downgrade without consulting your owner’s manual. DOT 5.1 offers superior heat resistance while remaining glycol-based — a meaningful advantage for vehicles that experience demanding brake conditions.
The DOT 5 Warning: A Costly Mistake
DOT 5 silicone-based fluid is not interchangeable with glycol-based fluids — and this is a critical distinction for any vehicle equipped with an ABS system. Silicone fluid can trap microscopic air pockets and compress unpredictably under pressure, undermining ABS performance exactly when you need it most. Unless you’re maintaining a collector vehicle that sits in a garage, DOT 5 should not be on your shopping list.
Finding Your Vehicle’s Specific Requirement
The fastest way to confirm the correct fluid is to check two places: the reservoir cap (which is often stamped with the required DOT rating) and your vehicle’s owner’s manual. These should always match. Worth noting: after 36 months of service, up to 91% of a fluid’s original corrosion inhibitors can be depleted, which makes matching the right fluid even more consequential for long-term system health.
In Richardson’s intense summer heat, boiling point stability isn’t a luxury — it’s a necessity. Thermal stress accelerates fluid degradation faster than in milder climates, making DOT 4 or 5.1 a smarter baseline choice for most local drivers. Keeping your entire brake system in top shape — including pad condition — compounds the benefit of using the right fluid from the start.
With the correct fluid identified, the next challenge is getting it into your system properly — and that’s where bleeding technique makes all the difference.

Step 3: The Professional Exchange vs. The DIY Bleed
With the right fluid selected, the next question becomes execution. Understanding how a flush is performed — and where professional technique diverges from a basic DIY approach — directly affects whether your brakes perform reliably when it matters most. According to AAA, brake system failures contributed to over 235,000 vehicle tows in a single year, a sobering reminder that incomplete or improper service is often worse than no service at all.
Tools Needed
- Fresh brake fluid (correct DOT rating for your vehicle)
- A vacuum bleeder pump or a pressure bleeder kit
- Clear plastic tubing and a catch bottle
- Box-end wrench (typically 8mm or 10mm) for bleeder screws
- Brake cleaner and shop rags
- A helper (for the two-person method)
The Process
1. Locate and prep the master cylinder reservoir. Remove the old fluid using a turkey baster or fluid transfer pump. Refill with fresh fluid before beginning. Never let the reservoir run dry during the process — introducing air into the system creates a hazard that requires additional correction time.
2. Follow the correct bleeding sequence. Always start at the wheel furthest from the master cylinder and work your way toward it. On most front-engine vehicles, that sequence runs: right rear → left rear → right front → left front. This order, explained clearly by AutoZone, ensures contaminated fluid is pushed completely out rather than circulated back through clean lines.
3. Choose your bleeding method wisely.
- Two-person method: One person slowly pumps the brake pedal and holds pressure while the other opens the bleeder screw briefly to release fluid. It’s low-cost but requires coordination to prevent air from being drawn back in.
- Vacuum bleeding: A solo technician uses a hand-held pump to draw fluid through the bleeder screw. Accessible for DIYers but prone to introducing micro air bubbles around worn bleeder screws.
- Pressure bleeding (professional standard): A pressurized canister attached to the reservoir pushes fresh fluid through the entire system consistently and quickly. This is the method professional shops use — it’s faster, more thorough, and significantly reduces the risk of air contamination. The difference in outcome is a primary reason the brake fluid exchange cost at a shop reflects more than just the price of the fluid itself.
4. Verification checkpoint — the firm pedal test. Before moving the vehicle, pump the brake pedal repeatedly. A spongy or low pedal indicates air is still present in the lines. Only a firm, consistent pedal feel that doesn’t compress toward the floor confirms the system is properly bled and safe to drive.
In practice, even a small air pocket left in the lines can cause delayed braking response. For drivers who want to keep their vehicles running reliably for years, this verification step isn’t optional — it’s the difference between a job done and a job done correctly.
Understanding the labor and equipment involved sets important context for the next conversation: what this service actually costs in Richardson, TX, and why cutting corners rarely saves money in the long run.
Brake Fluid Flush Cost: What to Expect in Richardson, TX
Understanding brake fluid replacement cost before you pull into a shop puts you in control of the conversation. Prices vary based on your vehicle type, the complexity of your braking system, and whether your car has an advanced ABS setup — but the range is more manageable than most drivers expect.

Price Ranges by Vehicle Type
For most standard sedans and compact vehicles, a professional brake fluid flush typically runs between $80 and $150. Larger vehicles — full-size trucks, SUVs, and performance vehicles — often fall in the $150 to $200+ range. As CarParts.com notes, brake fluid replacement cost varies significantly based on vehicle type and the complexity of the ABS system. A truck with a sophisticated multi-channel ABS setup requires more time, more fluid volume, and more precise bleeding procedures than a basic passenger car.
Labor vs. Fluid: Where the Value Lives
The fluid itself is relatively inexpensive — typically $10 to $25 per bottle, depending on DOT rating. What you’re really paying for is labor, equipment, and expertise. Pressure bleeding machines and vacuum systems ensure every trace of old, moisture-laden fluid is purged from the lines. A proper flush performed on a modern vehicle with ABS and electronic stability control can’t be done effectively with a hand pump and a willing helper. The specialized equipment shops use justifies the labor rate, and shops staffed with certified brake technicians bring a level of precision that protects your investment.
The Hidden Cost of Skipping the Service
Here’s where the math becomes undeniable. A neglected brake fluid flush doesn’t just leave you with spongy pedal feel — it sets up a corrosion cycle that destroys expensive components from the inside out. An ABS control module replacement can run $1,200 or more. Corroded brake calipers add another $300 to $800 per axle. Even a single seized brake line can push your repair bill past $500.
A $150 maintenance service vs. a $2,000+ repair bill isn’t a close call — it’s the clearest value proposition in routine vehicle care.
Maintenance Cost vs. Repair Cost
| Service | Typical Cost |
|---|---|
| Brake fluid flush | $80–$200 |
| ABS module replacement | $1,000–$1,500 |
| Brake caliper replacement (per axle) | $300–$800 |
| Brake line repair | $400–$600 |
Local Expertise Without the Dealership Markup
Kwik Kar delivers the same diagnostic capability and technical standards you’d expect at a dealership — without the inflated labor rates. The shop holds RepairPal and ASE certifications, which means the technicians working on your brake system meet the same credentialing benchmarks dealerships use to validate their staff. For Richardson drivers, that combination of competitive pricing and verified expertise makes the decision straightforward.
Of course, knowing what the service costs is only part of the picture. Questions about where to go, how often to schedule it, and whether it’s truly necessary are just as common — and worth addressing directly.
Common Questions: Jiffy Lube, Dealerships, and Intervals
Now that you understand what a flush costs and why the price is justified, a few recurring questions tend to surface. Here are direct, honest answers to the ones drivers in Richardson ask most often.
Can a quick-lube shop handle a complex ABS flush?
It depends entirely on certification, not the shop’s name. Modern ABS systems require a technician to cycle the ABS modulator using a scan tool during the flush — otherwise, trapped contaminated fluid remains in the system. ASE-certified technicians are trained specifically for this process. Before scheduling brake fluid exchange services anywhere, ask whether their techs hold current ASE certifications and whether they use electronic scan tools for ABS-equipped vehicles. A shop with qualified, certified staff will answer that question without hesitation.
How often should a flush actually happen?
Most manufacturers recommend a brake fluid exchange every 2 to 3 years regardless of mileage, according to Jiffy Lube and Kelley Blue Book. A common working guideline is the 2-year/30,000-mile rule — whichever comes first. In practice, Richardson’s hot summers accelerate moisture absorption, so erring toward the shorter interval makes sense here. Checking the moisture content with a test strip at each oil change is a smart habit that costs nothing and catches problems early.
How do you know the flush was done correctly?
Two immediate indicators: the fluid visible in the reservoir should appear clear to light amber — not dark brown or murky — and your pedal should feel firm and consistent from the top of the stroke. A spongy pedal after a supposed flush signals air or remaining contaminated fluid in the lines. You can also review signs it’s time for brake attention to cross-reference what “normal” should feel like after service.
Is a flush really necessary, or is it an upsell?
Degraded brake fluid with a boiling point reduced by moisture contamination is a documented cause of brake fade and hydraulic failure — that’s not a sales tactic, it’s physics. Studies consistently show that fluid absorbing just 3% water by volume can drop its boiling point by over 25%. Skipping this service doesn’t save money; it defers a risk that carries consequences far more expensive than the flush itself.
Those answers point toward one conclusion worth examining closely.
Conclusion: Secure Your Stopping Power at Kwik Kar
Brake fluid is hygroscopic — it absorbs moisture from the air over time, and that absorbed water steadily lowers the fluid’s boiling point. When boiling point drops, heat from repeated braking can vaporize the fluid, creating gas bubbles that compress instead of transmit force. The result is a soft pedal, delayed stops, and a dangerous gap between your reaction and your vehicle’s response. A routine flush eliminates that moisture before it becomes a liability.
Preventative maintenance is almost always cheaper than reactive repair. A brake fluid flush typically runs $80–$150 in Richardson. Compare that to a seized caliper replacement at $300–$500 per corner, a master cylinder rebuild at $500–$900, or ABS module damage that can push well past $1,000. As brake performance specialists note, neglecting fluid changes allows contamination to accelerate wear throughout the entire hydraulic system — components that were never meant to work in degraded conditions. If you’ve ever noticed your pedal feeling unusually firm or spongy, those are early warnings worth taking seriously before the underlying cause escalates.
Staying on top of fluid health also means catching issues early. Knowing the warning signs of brake trouble before they worsen is how Richardson drivers avoid both roadside emergencies and repair bills that could have been prevented.
Safety Check: What You’ve Learned
- Moisture contamination lowers boiling point and reduces braking performance
- Flushes every 2–3 years (or 30,000 miles) protect the full hydraulic system
- Typical flush cost ($80–$150) is a fraction of downstream repair expenses
- ASE-certified service ensures proper fluid type selection and complete system bleed
- Free moisture testing is available — there’s no reason to guess your fluid’s condition
Richardson drivers deserve brakes they can count on. Visit Kwik Kar for a free brake fluid moisture test and let an ASE-certified technician confirm whether your system is protected. Schedule your brake service today — because stopping safely should never be left to chance.